How to Add Transitions in CapCut: The Ultimate Guide
Adding transitions in CapCut is arguably the easiest way to level up your video editing skillset.
In this ultimate guide, I'll show you how to add transitions, how to make them longer, how to make custom transition effects, and even do some troubleshooting.
If you want to go from zero, to transition effects hero on PC, you're reading the right article.
Want 10 Royalty Free LoFi Tracks?
Enter your email and we'll send them now!
In This Article
How to Add Transitions in CapCut?
The guys at CapCut have made working with video transitions super simple. Here's how to add transitions in CapCut:
- Start a new project, or open an existing CapCut project
- Import your video and/or images and drag them to the timeline
- In the top left menu, click "Transitions"
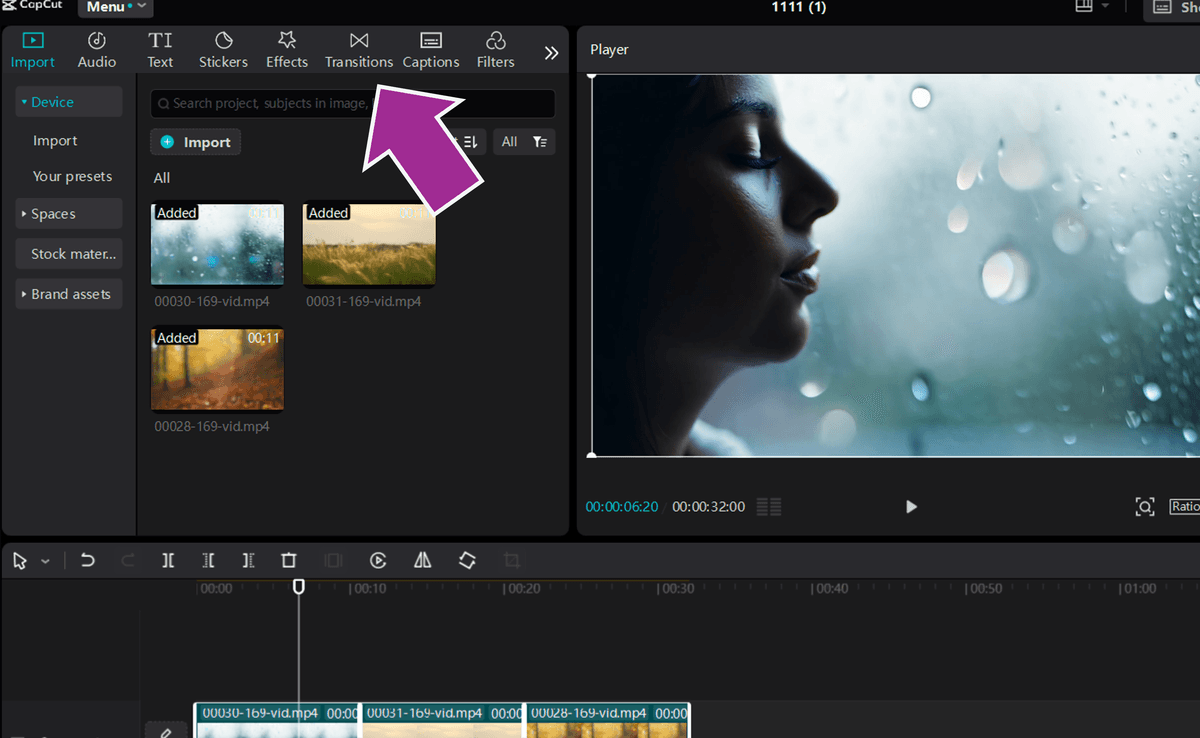
- Now you'll see a collection of CapCut transitions to choose from. You can use the search bar to find specific effects including seamless transitions and smooth transitions
- Hover over any transition for a mini video preview, or click one to show a full video preview in the viewport using your content
- When you've found the transition you want to use, drag and drop it onto you timeline between the two video clips you want to apply it to
- You just added your first transition!
If you get a notification reading "Create duplicate frames for transition", simply click ok. This just adds a few frames to either end of you clips so the transition works effectively.
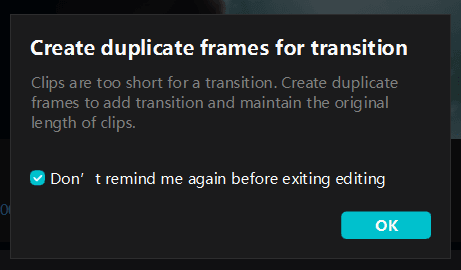
Watch out for: Make sure you don't use a transition marked as "Pro" if you're a free user. You won't be able to export your content without subscribing to CapCut Pro!
How to Make CapCut Transitions Longer
Ok so you've added your transition effects, now you want to make it longer! The good news is with modern video editing apps like CapCut, it's super simple. To make transitions longer in CapCut:
- Once your transition is added to the video clips on your timeline, click it
- You might need to timeline zoom as the transition effects can be quite small, if so, click the + icon on the right side above the timeline
- Now, in the top right panel you'll see a "Duration" slider. Click and drag this, or enter a duration in the input field.
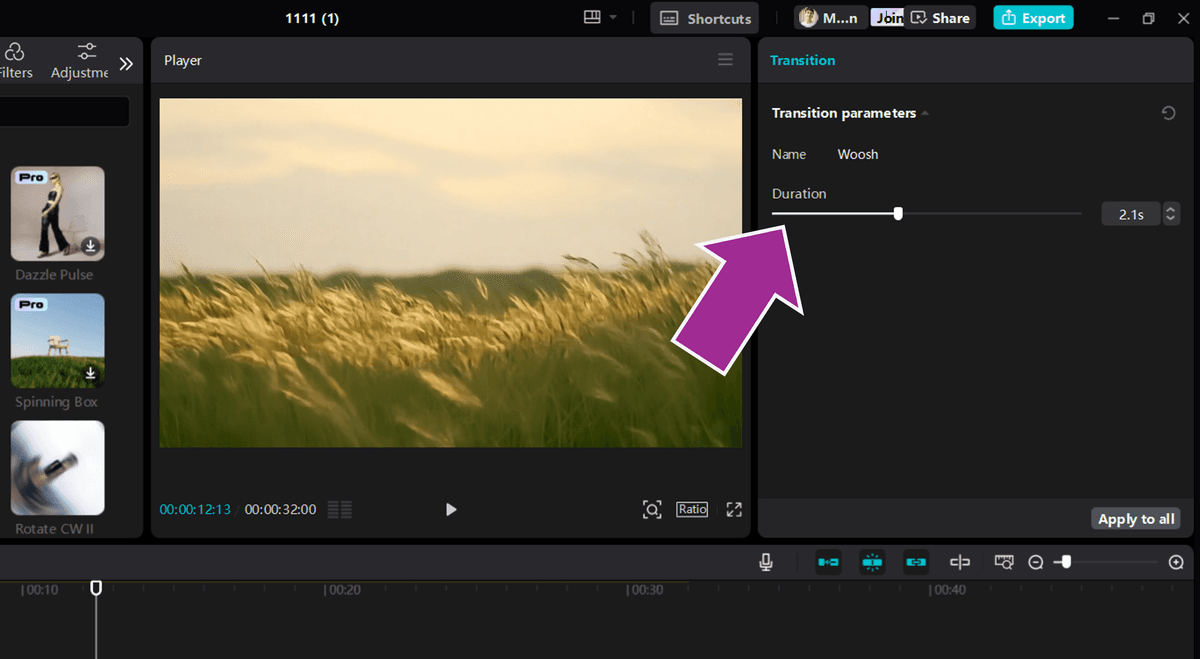
- Alternatively, to manually adjust the transition duration, you can click the edge of the transition on the timeline and drag it
Watch out for: The standard CapCut transitions have a max duration of 5 seconds
Pro Tip: To reset your transition effects, click the undo icon in the top right, above the duration slider
How to Apply Your Transition to All Clips
Now we've added a transition effect, adjusted the duration, and we want to add that same transition to multiple clips on the timeline. Here's how to apply a transition to all clips in CapCut:
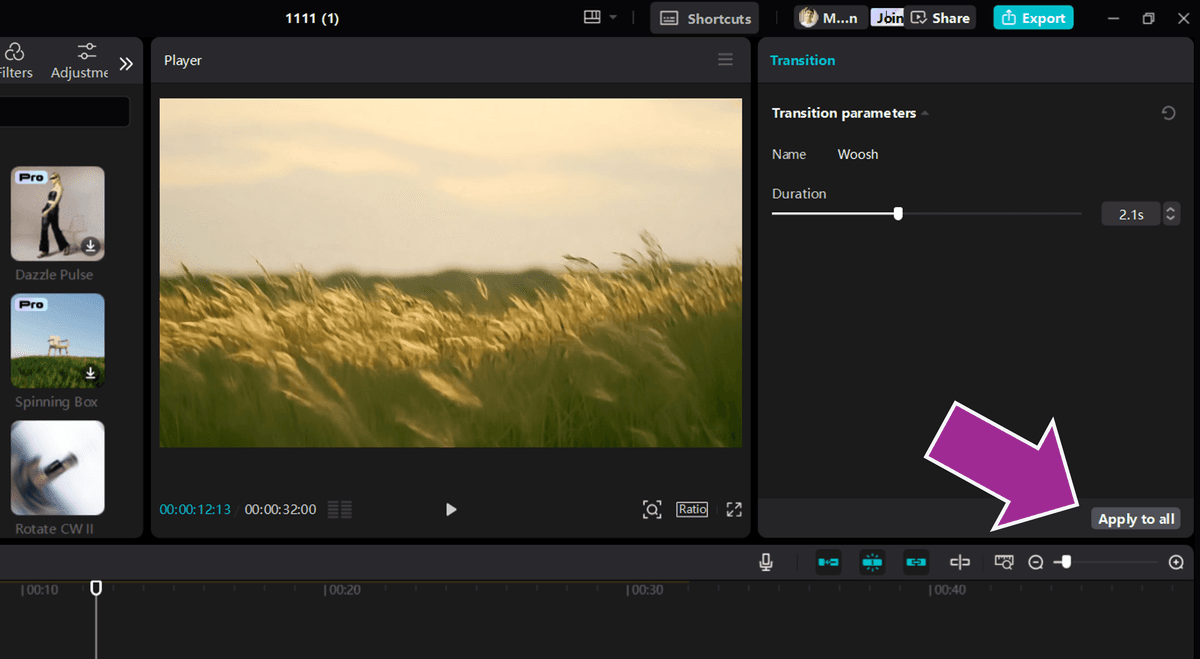
- Click the transition you want to add to all clips
- Click "Apply to all" on the right hand side of the screen, below the Duration slider
How to Fix "Video too Short for Transition" Error
If you're seeing this error when trying to add transitions in CapCut, there's 2 simple fixes. To solve the video too short for transition error in CapCut:
- Use Slow Motion: Click the clip that is too short, click "Speed" in the top right hand panel, adjust the Speed slider to make the clip longer!
- Use a Longer Clip: This one's obvious but you might want to consider using a longer video clip for the transition effect
How to Add Transitions to Text in CapCut
So far we've covered how to add video transitions to your video clips in CapCut. But what if you want to add the same transition effects to your text? Here's how to add transitions to text in CapCut:
- Remove any existing transition effects that have been added to your video clips (click, then press delete)
- Add your text and position it on the timeline

- Highlight both the video clip and the text box. Left click and drag, or holding Ctrl or Cmd and clicking the video clip and the text box on the timeline
- Left click the highlighted clips and click "Create compound clip"
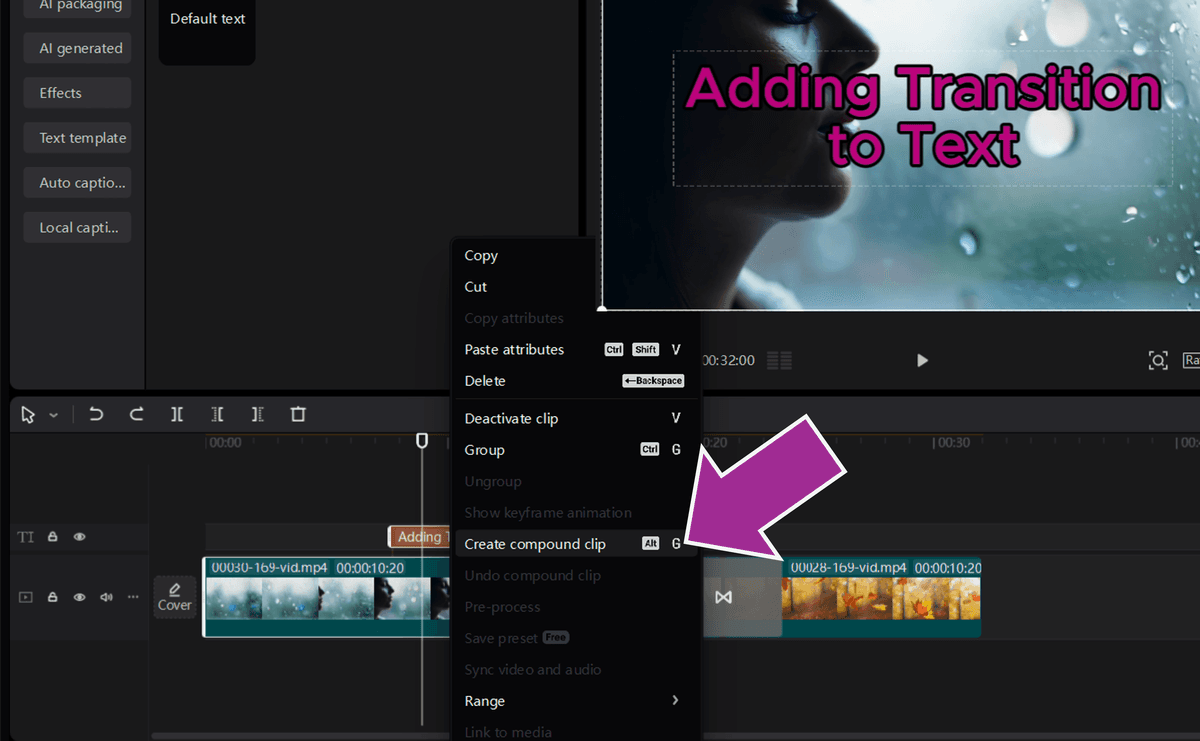
The "Create compound clip effectively merges your text and video into a single item. Now you can apply various transitions to the clip as normal!
To undo this later and remove the text from the transition, you can right click the clip and click "Undo compound clip."
Learning the Different Types of CapCut Transitions
Being such a versatile video editing tool, CapCut offers a wide range of video transitions that can help maintain smooth flow throughout your content. Here's a list of the different types of transition effects in CapCut, and when you might want to use them:
- Basic Transitions: Simple fade, dissolve, and slide effects that create natural movement between clips, perfect for vlogs and casual content
- Smooth Transitions: Creates a seamless blend between scenes using motion and matching elements, ideal for maintaining visual flow in travel videos and montages
- Flash Transitions: Quick, bright flashes that create energy and momentum, great for music videos and dynamic sports content
- Blur Transitions: Gradually blurs one scene into another, excellent for dreamy sequences or hiding jarring cuts in your video editing
- Zoom Transitions: Uses camera movement to push in or pull out between clips, effective for revealing new scenes or creating dramatic emphasis
- Wipe Transitions: One clip replaces another with a directional movement, useful for showing before/after comparisons or location changes
- Morph Transitions: Transforms one shape or element into another using visual effects, perfect for creative storytelling and artistic videos
- Audio Transitions: Synchronizes sound effects with visual changes, enhancing the impact of your transitions and keeping your audience engaged
- Text Transitions: Animated text effects that can move, fade, or transform, ideal for tutorials and educational content where text plays a key role
- Overlay Transitions: Uses additional visual elements like shapes or patterns to bridge clips, great for creating a consistent branded style
- Custom Transitions: Combine different effects and techniques to create unique visual effects that match your specific editing style and content needs
By now you've probably noticed that applying transitions is the easy part. Sometimes choosing the right one is the hard part!
Tired of Wasting Hours Looking For
Royalty-Free Assets?
Access our curated library of 100,000+ royalty free assets instantly
Wrapping Up
Today we learned everything there is to learn about adding transitions in the CapCut desktop app.
The next step, if you were really looking to level up your transition game, would be to start creating custom transitions in the video editor using keyframes and chroma key tricks.
But... we'll save that for another day. If you really want to keep reading, check out this guide on taking screenshots in CapCut.
Happy editing. 😎


