How to Add Keyframes in CapCut: The Ultimate Guide for PC and Mobile
Learning how to work with keyframes is a logical progression for anyone looking to level up their video editing skills in 2024.
Today I'll show you how to add keyframes in CapCut, considering both the desktop and PC versions. Plus, we'll create a simple animation using keyframes so you can really lock in the skill of keyframe animations in CapCut.
Before we start, don't forget to get your free CapCut assets below. 👇
Want 10 Royalty Free LoFi Tracks?
Enter your email and we'll send them now!
In This Article
What Are Keyframe Animations?
Keyframe animations are points set at precise times in a video clip to define the start and ending points of effects, transitions, scale adjustments, rotation, and any other effect parameters you want to add.
Keyframes are a powerful yet simple video editing tool for creating smooth animations and are an essential skill to add to your video editor toolkit.
Understanding Keyframe Animation for New Video Editors
I remember being brand new to video editing and hearing the term "keyframes" thrown around quite often. I recall thinking to myself that they sounded super advanced, but the good news is, they're are not!
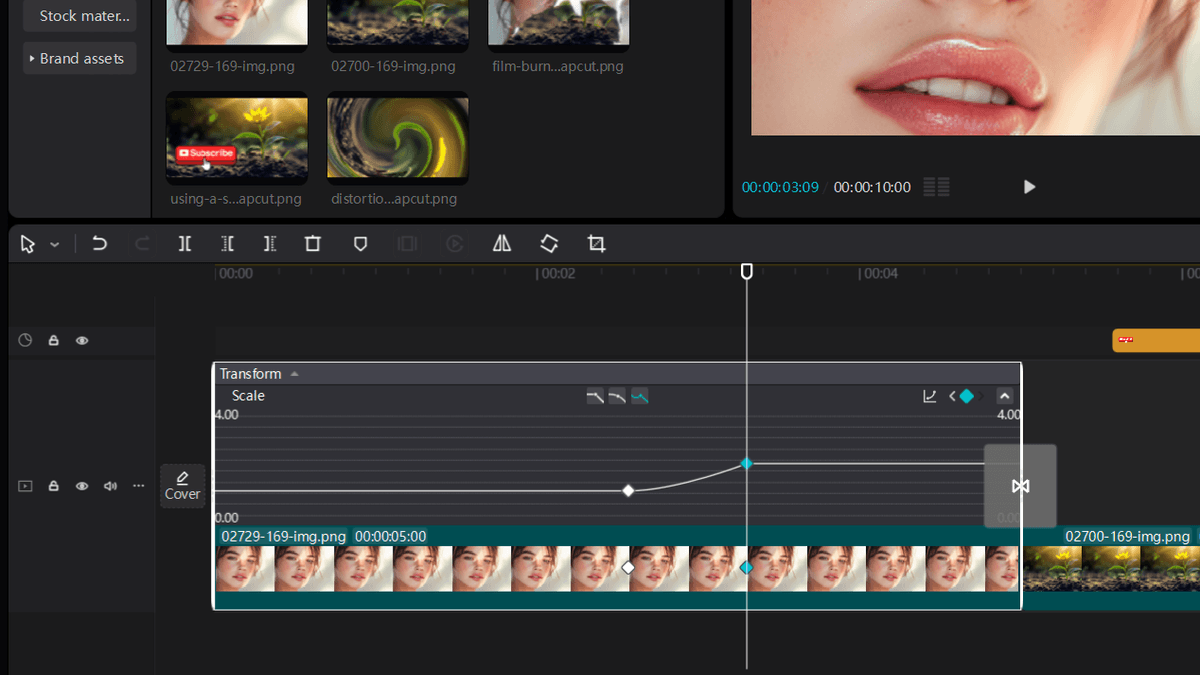
Think of keyframes like taking snapshots of an object at different moments. The diagram below shows a basic keyframe animation to increase the scale, then return it over 2 seconds:

- At 0s: Object starts small - scale = 100%
- At 1s: Object grows bigger - scale increase to 115%
- At 2s: Object returns to original size - scale returns to original 100%
CapCut automatically creates smooth transitions between these "snapshots", shown by the small diamonds. And like connecting the dots, you just set these key moments and your parameter values, and the software handles everything in between!
How to Add Keyframes in CapCut for PC
Here's how to add keyframes in CapCut for PC users:
- Click your clip or element on the timeline, the Animation panel will open in the top right hand side
- Move the playhead to desired starting point of your keyframe animation
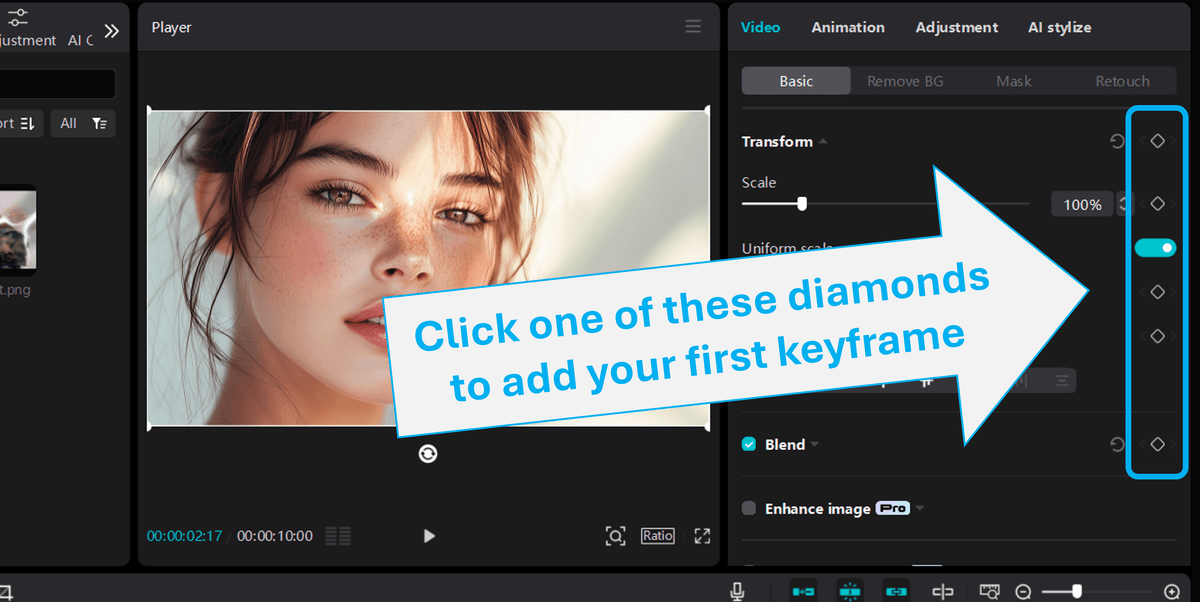
- Click the diamond icon next to the parameter you want to animate to set the initial keyframe

- Move playhead to the TIME where you want animation's midpoint to be, and adjust your property from step 3 (increase, decrease, move around, etc.)
- Click diamond icon again to set the midpoint keyframe
- Preview animation and adjust timing and properties as needed!
You just added a simple 2-step keyframe animation!
How to Add Keyframes in the CapCut Mobile App
Here's how to add keyframes in CapCut for mobile app users:
- Select your clip or element on the timeline
- Move timeline cursor to where you want to place your first keyframe
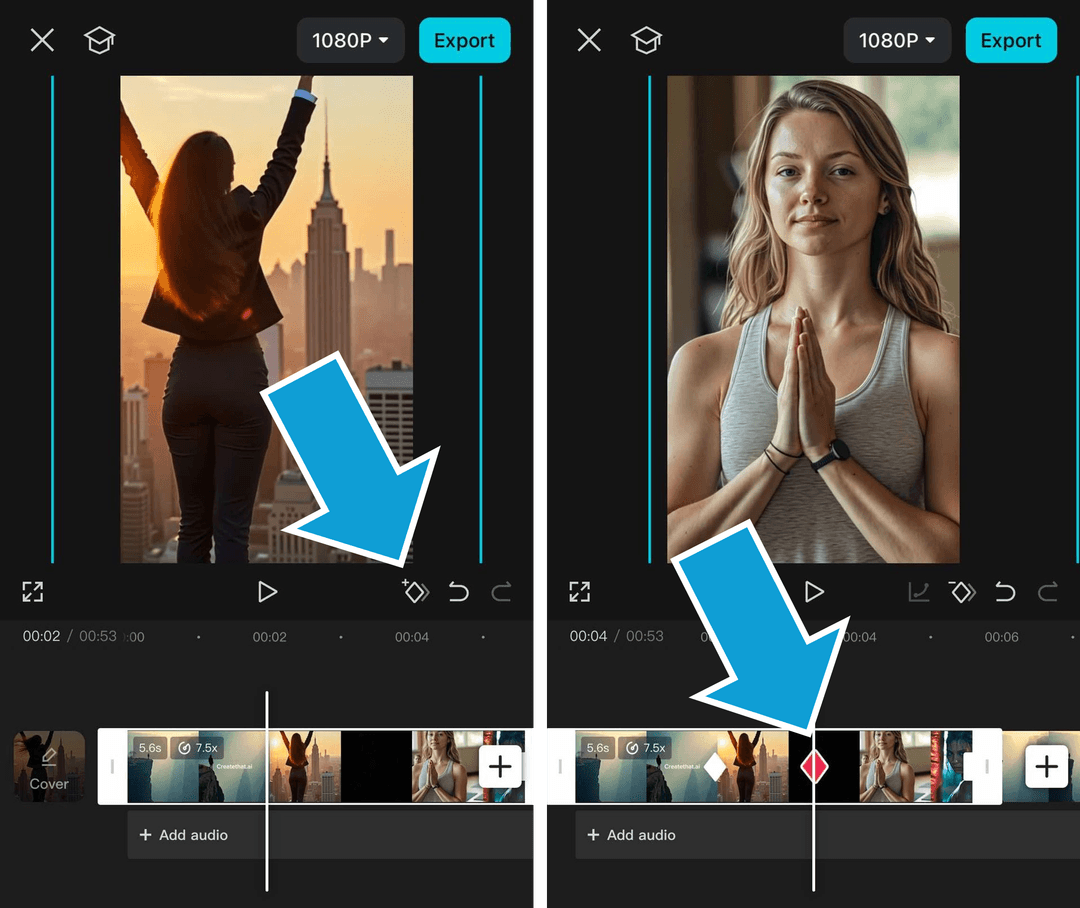
- Tap the diamond icon below the viewport, shown below

- Move cursor to next point, adjust your property values
- Tap diamond icon again to set another keyframe
- Tap the "graph" icon beside the diamond shaped icon to add non-liner smooth animations between your keyframes
- Preview and fine-tune timing/values as needed
Quick Tips for using Mobile Keyframes:
- Use two fingers to pinch zoom timeline for precise keyframe placement
- Tap between keyframes to add midpoint adjustments
- Hold and drag keyframe diamonds to adjust timing
- Double tap diamonds to modify exact values
- To remove a keyframe, move your play head over it, and tap the keyframe diamond again
That's it! You've now added keyframes on mobile. The principles are the same as desktop - you're just setting those key moments and letting CapCut handle the smooth transitions between them.
Smooth Keyframe Animations with Speed Curve Graphs
When you add keyframes in CapCut, the animations are linear by default. This means they can be jarring for the viewer. Take the image below, you can see how the standard linear motion graph has instant changes, compared to the nice non-linear curves in the smooth motion example.

To add these dynamic animations in CapCut PC:
- Add your keyframes as normal using the keyframe icon
- Once keyframes are positioned, right click the clip on the timeline and select "Show keyframe animation"
- Then click the "Graphs" icon shown below

- Chose the curve you want to use from the list and apply keyframe animation
- Playback your video to check it works well!
To add dynamic animations in CapCut mobile:
- Finish your keyframe editing on your desired clip
- Move the playhead over a keyframe
- Tap the "Graphs" icon shown below
- Choose your speed curve
- Preview and fine-tune as needed!
Tired of Wasting Hours Looking For
Royalty-Free Assets?
Access our curated library of 100,000+ royalty free assets instantly
Wrapping Up
Today we took your video editing game to another level by learning how to add keyframes to your video clips in CapCut.
Setting keyframes in CapCut is fairly easy, mastering them takes a while! So don't be scared to play around, move things, and break things.
In no time you'll be keyframe editing like a pro, adding keyframes to your video clips will become second nature.
Happy editing. 😎


