10 Best CapCut Transitions for YouTube and Social Media
Adding video transitions to your CapCut project can make all the difference when it comes to capturing your audience's attention, and growing on YouTube.
In this guide, I'll show you the 10 best CapCut transitions you should be using to capture attention with your content in 2024!
If you want to get started with some original free transition effects, use the form below to get 10 FREE chroma key transitions for CapCut!
Want 10 Royalty Free LoFi Tracks?
Enter your email and we'll send them now!
Learn how to use chroma key transition effects in CapCut here.
In This Article
What Are the Best CapCut Transitions?
The best transition effects for video editing in CapCut are film burns, light leaks, and a variety of other effects we'll explore below.
I hand picked these transition effects based on simplicity, popularity, and of course the unique visual impact of each!
Once you've learned how to add transitions in CapCut, pick and choose from the various transitions listed here to level-up your social media game and YouTube content.
1. Film Burns and Light Leaks
Film Burns are vintage-style light leak transitions that add a nostalgic, analog feel to your videos.
These transitions mimic the appearance of damaged or exposed film, creating warm flashes of light that naturally blend between one scene to the next. Perfect for creating a retro or flashback style atmosphere in your content.

To use film burns and light leaks in CapCut, navigate to the transitions menu and search for "burn" or "light leak" effects. You can adjust the intensity and duration of the burn effect to suit your style, making it either subtle or dramatic depending on your project.
This style of transition works particularly well for travel videos, music content, or any footage where you want to add a touch of classic filmmaking aesthetic to your edits.
2. Zoom in and Zoom out
Everyone loves a good zoom transition! These smooth flow seamless transitions seriously work and are one of the most versatile video transitions in the game.
These smooth, seamless transitions create a natural flow between scenes by either zooming into a focal point or zooming out to reveal the bigger picture. What makes them so effective is their ability to keep your audience engaged while transitioning between clips.
To add transitions using the zoom effect in CapCut, simply drag and drop the zoom transition between your clips. You can adjust the speed and intensity of the zoom to match your editing style - whether you want a subtle movement or a dramatic reveal.
3. Slide
Similar to zoom transition effects, slide transitions are a simple but super effective way of adding transitions to your content in the CapCut app.
I made this simple yet effective transtion combining the "Shake" effect and CapCut LUTs! You can learn How to make this transition here.
With CapCut's easy-to-use interface, you can add transitions that slide your content in any direction. These transitions work particularly well for presenting related information or showing before-and-after sequences.
To implement slide transitions in your project, navigate to the transitions menu and choose your preferred slide direction. The beauty of slide transitions lies in their simplicity and effectiveness in maintaining visual flow.
4. Overlays
Overlays can be used for a bunch of things in CapCut including subscribe buttons, visual effects, and of course video transitions! They're a powerful yet simple way to take advantage of layering in your CapCut videos.

Whether you're using light leaks, geometric shapes, or custom patterns, overlays can help you add transitions that feel unique and professionally crafted. The CapCut video editor makes it simple to drag and drop these effects exactly where you need them.
To use overlay transitions effectively, experiment with different opacity levels and blending modes to create smooth transitions that complement your content rather than overshadow it.
5. Chroma Key
Chroma key transition effects are a simple way to add unique and original next scene transitions to your video clips using green screen effects.
This advanced technique allows you to add transitions that seem to transform one scene into another through color replacement. It's particularly effective for creating portal effects or seamless environment changes that keep your audience engaged.

To use chroma key transitions in CapCut, you'll need footage with a solid color background. The video editor then allows you to background remove this color and create a smooth transition effect.
6. Glitch
Glitch transitions are super popular right now. They give your video editing that glitchy kinda feel and are super effective when used in video hooks to capture attention.
These digital distortion effects add a modern, tech-inspired feel to your video transitions. They're particularly effective for hook sections or transitioning between high-energy sequences where you want to maintain engagement.
To add transitions with the glitch effect, CapCut offers several preset options you can drag and drop between clips. You can adjust the intensity and duration to match your content's pace and style!
7. Distortion
Distortion transitions create dynamic movement between scenes through warping and morphing effects that can transform your footage in creative ways.

These effects can stretch, twist, or dissolve your clips into each other, creating smooth transitions that feel both artistic and intentional. As a professional editor's tool, distortion transitions can add a unique signature style to your content.
CapCut makes it easy to add transitions using distortion effects - simply select your preferred distortion style and adjust the parameters to achieve your desired look.
8. J Cuts and L Cuts
J Cuts and L Cuts are effective audio-based transitions that can take your videos from amateur to professional with just a few simple adjustments to your video editing timeline.
These transitions focus on manipulating the timing between your audio and video layers to create seamless scene changes. J Cuts let your viewers hear what's coming before they see it, while L Cuts keep the current audio playing as new visuals appear. Both techniques are fantastic for maintaining flow and keeping viewers hooked.
To use J and L cuts in CapCut, you'll need to get comfortable with separating and adjusting your audio tracks. Don't worry though - while it might seem technical at first, these transitions are actually quite simple to create once you understand the basic concept.
This style of transition works especially well for storytelling style content, documentaries, interviews, or any situation where you want to create a natural flow between scenes without relying on flashy visual effects.
9. Background Remove
These custom transitions are a modern take on the traditional transition, and are super popular with YouTube shorts and other short form social media content.
This technique involves removing backgrounds from your subjects and using them as transitional elements between scenes.
To create these transitions in CapCut, use the background removal tool to isolate your subjects, then animate their entrance and exit to create smooth transitions between scenes. Adding sound effects will help to enhance the impact of these transitions.
Check out @OurFuture's YouTube shorts, their channel use this method extremely well, and are actually the ones who introduced me to it!
10. Custom Transitions
Custom video transitions are where you can truly showcase your creativity as a professional editor by combining different transition options to create unique effects.
By using keyframes, masks, and various effects in combination, you can add transitions that perfectly match your content's style and flow. To create custom transitions in CapCut, try combining these elements:
- Use shape masks with motion tracking to reveal your next clip through moving objects
- Combine speed ramping with blur effects for dynamic movement transitions
- Layer multiple basic transitions (like slides and fades) with adjusted timing and opacity
- Create picture-in-picture effects using scaling and position keyframes
- Use text as masks to reveal new scenes through animated words
- Combine color adjustment effects with speed changes for unique mood transitions
- Mix overlay effects with masking for textured scene changes
The possibilities are endless - experiment with these techniques and develop your own signature transition style that sets your content apart from others using basic presets.
How to Use Transitions in CapCut
To add video transitions in CapCut PC:
- Open your project in the CapCut video editor
- Import your video clips to the timeline
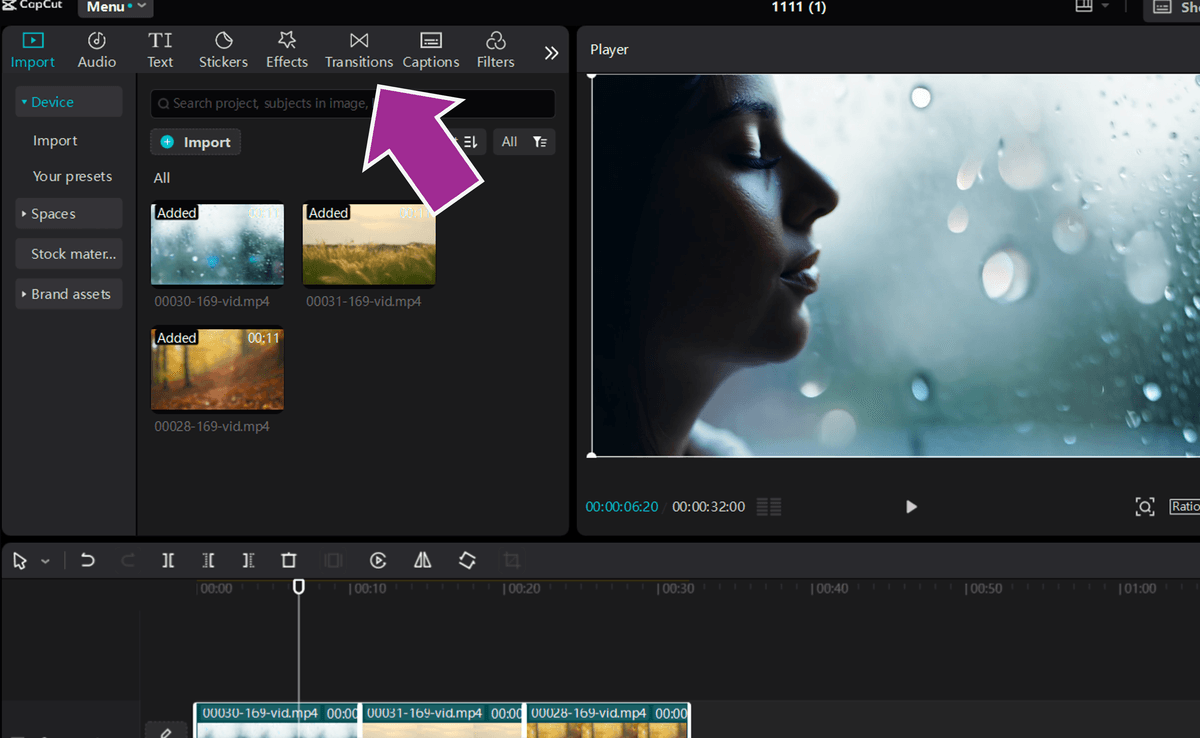
- Click the "Transitions" button in the top menu
- Browse through the available transition effects, or use the search bar
- Drag and drop your chosen transition between the clips
- Adjust the transition duration using the slider in the top right
- Preview your transition by playing back the timeline
- Fine-tune the transition timing if needed!

To add video transitions in the CapCut app:
- Launch CapCut on your mobile device
- Start a new project or open an existing one
- Add your video clips to the timeline
- Select the "Transition" option from the bottom menu
- Scroll through the transition effects library
- Tap a transition to preview it
- Tap the checkmark to apply the transition
- Adjust the duration by dragging the handles
- Repeat for other clips as needed!
Wrapping Up
Today we learned about the best transitions to use in CapCut for YouTubers and social media content creators.
If you're a new editor, you just stumbled on arguably the easiest way to quickly level up your content!
Don't forget to use the form to get your 10 free transition effects courtesy of createthat.ai!
Happy editing. 😎


