How to Blur on CapCut (Backgrounds, Faces, and More)
Using the blur effect in the CapCut app is simple, but what if you want to blur a specific feature or part? What about blur effects with tracking? And multiple blur effects?
In this guide, I'll show you everything you need to know to become an expert blur effect user in CapCut with some neat tricks along the way.
Let's learn about blur effects in CapCut video editing.
Want 10 Royalty Free LoFi Tracks?
Enter your email and we'll send them now!
In This Article
How to Blur on CapCut?
Here's how to apply a blur effect to your entire video in CapCut. Read on to learn about blurring a video background or how to add multiple blur effects.
For Desktop Users
- If you don't have it already, get the CapCut app
- Import your video to the timeline
- Click "Effects" from the top left menu
- In the search bar, type "Blur" and press enter
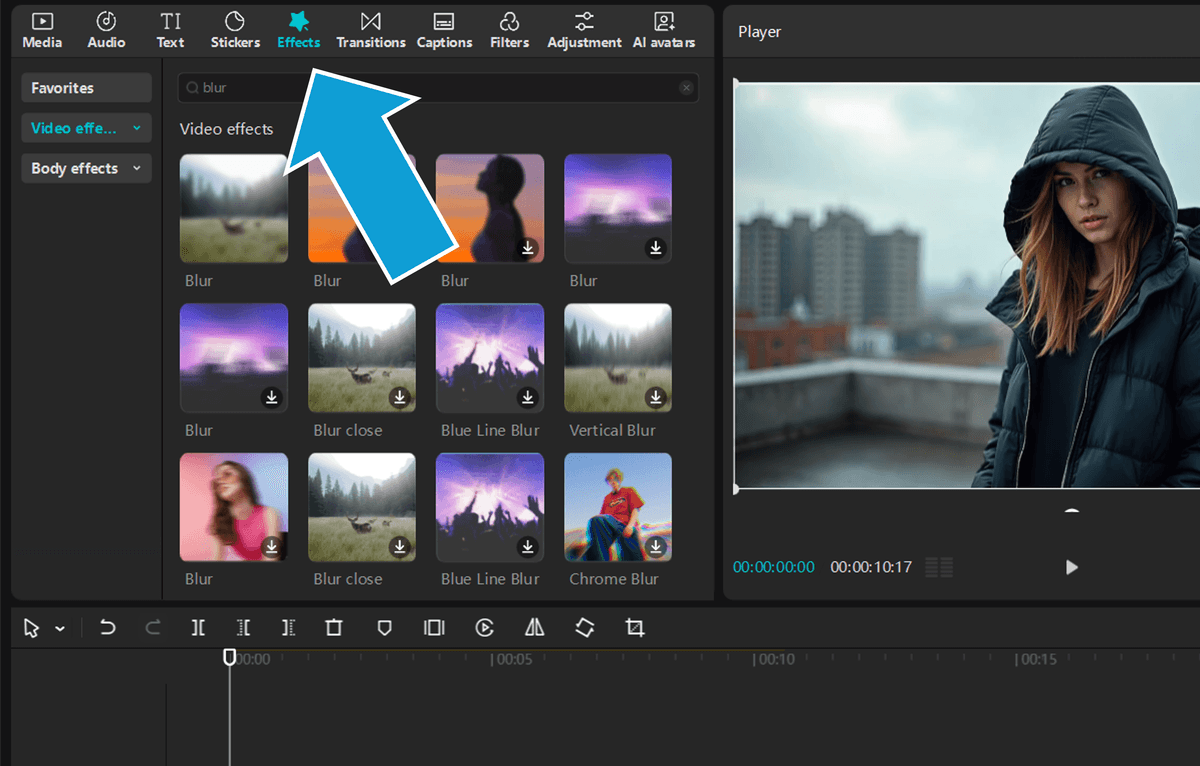
- Click the blur effects to preview them on your footage, then drag and drop your chosen one onto the timeline
Pro tip: To apply the blur effect to an entire video clip, drop the effect directly on it. If you only want to apply blur to a part of a video, drop it ABOVE the clip on the timeline.
For Mobile Devices
Similar to applying blur effects on the desktop app, here's how to use blur video effects in the CapCut mobile app:
- From the bottom menu, tap "Effects" then "Video effects"
- Type "blur" in the search bar, tap the one you want to use, it will be automatically added to your timeline
- Press "Cancel" to exit the Effects menu
- On the timeline, tap the blur effect then tap "Adjust" to adjust the blur intensity
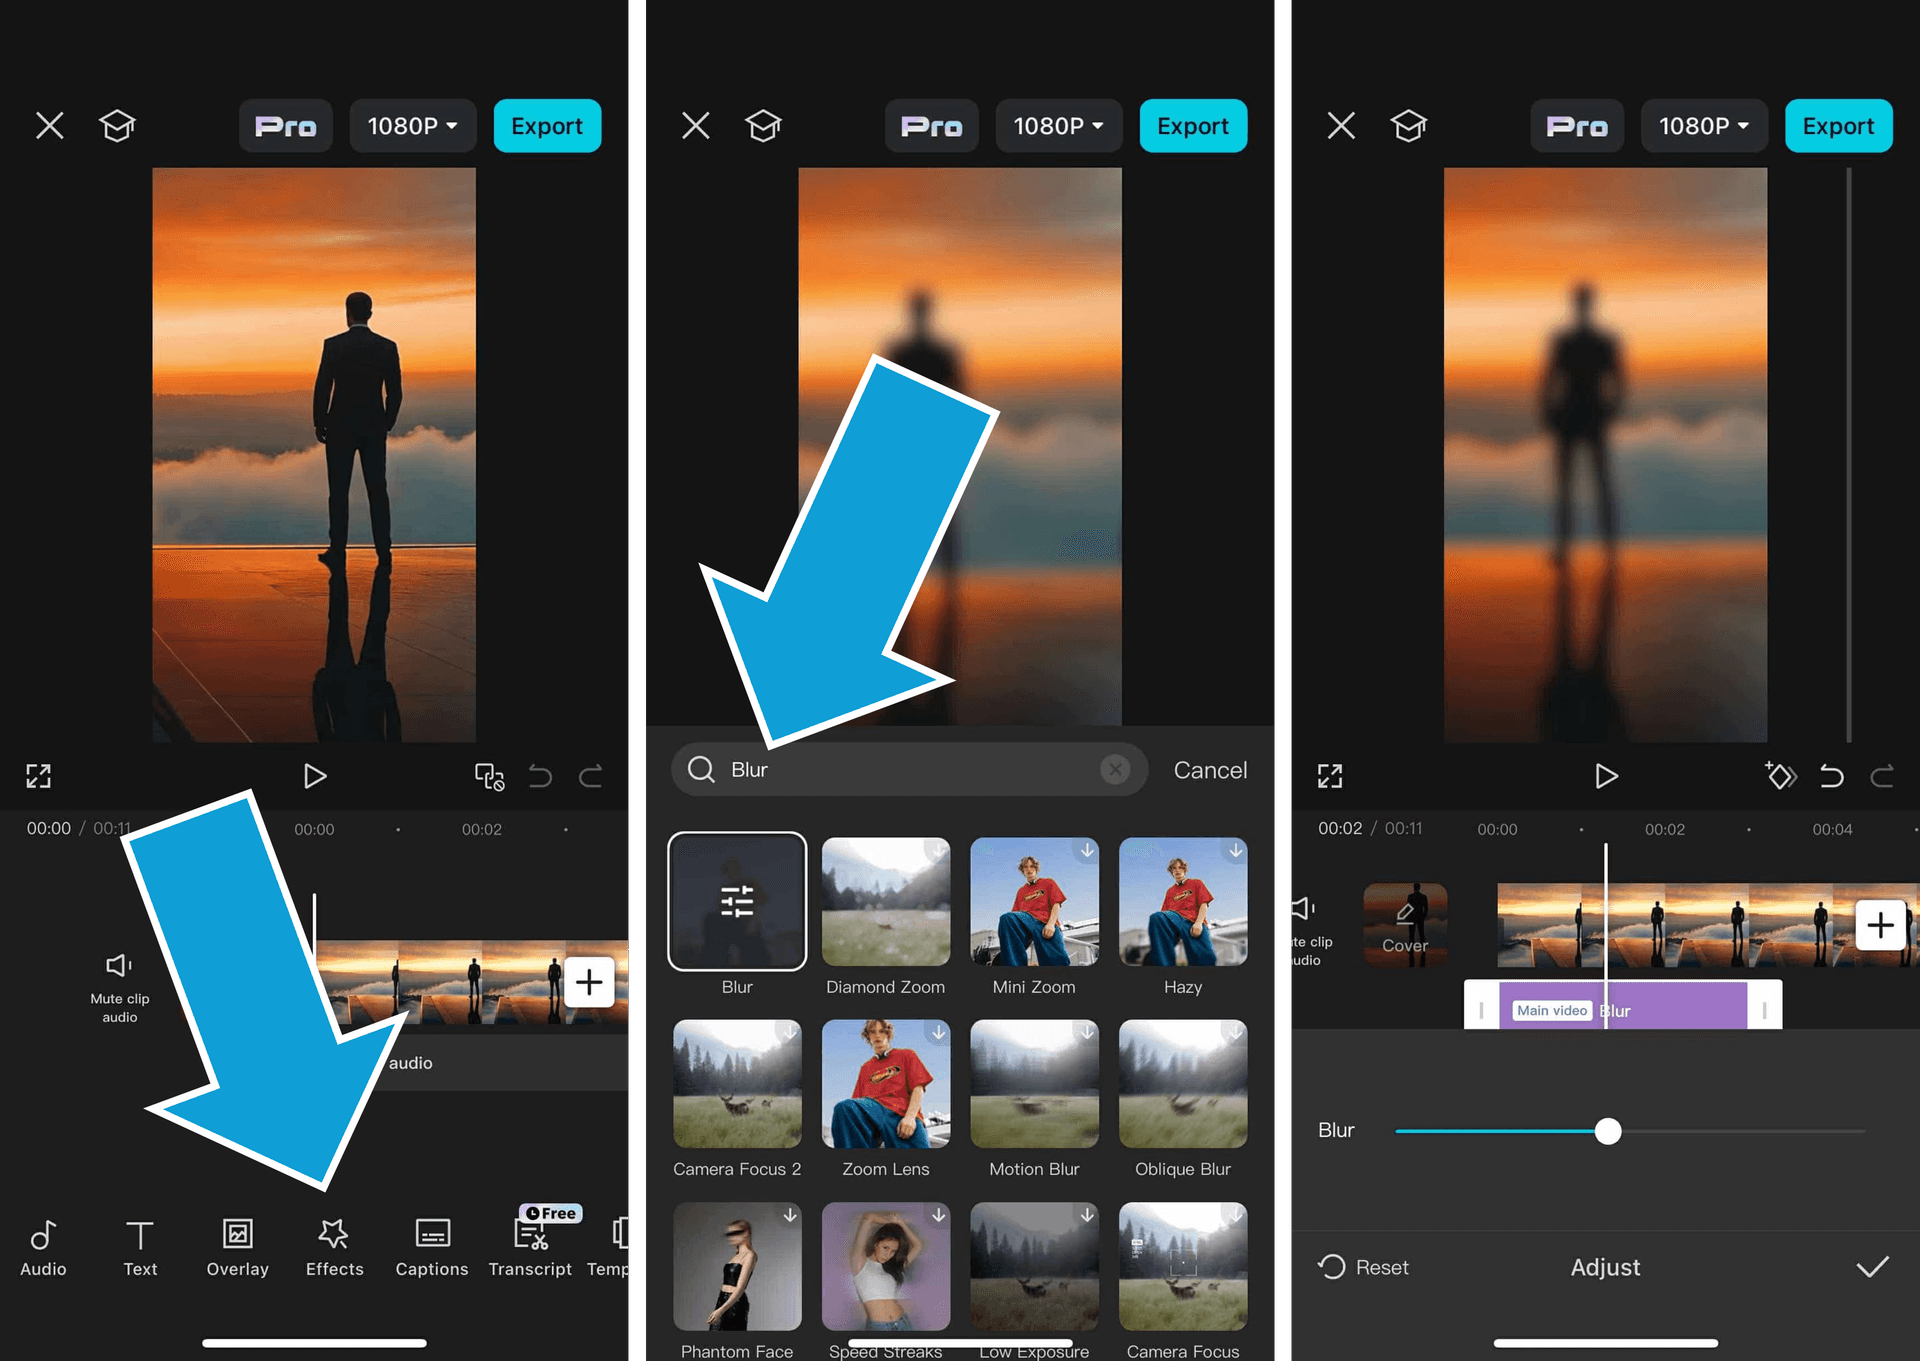
That's it! Now we know how to add blur effects in CapCut, let's take a look at some more advanced techniques.
How to Blur the Background in CapCut
There's two ways to easily blur the background in CapCut. Depending on your footage, one of these methods usually works better than the other, so try each of them out if you're not satisfied with the results right away.
- Using a Mask: Is generally easier if you want to blur a specific section of the video background
- Using Remove BG: Generally easier for applying blur effects to the background of an entire clip
Blur the Background Using a Mask
Here's how to apply a blur effect to the background of your video using a mask:
- Add the blur effect to your timeline over the section you want to blur
- Click the blur effect, then in the top right panel, click "Mask", then "Add mask"
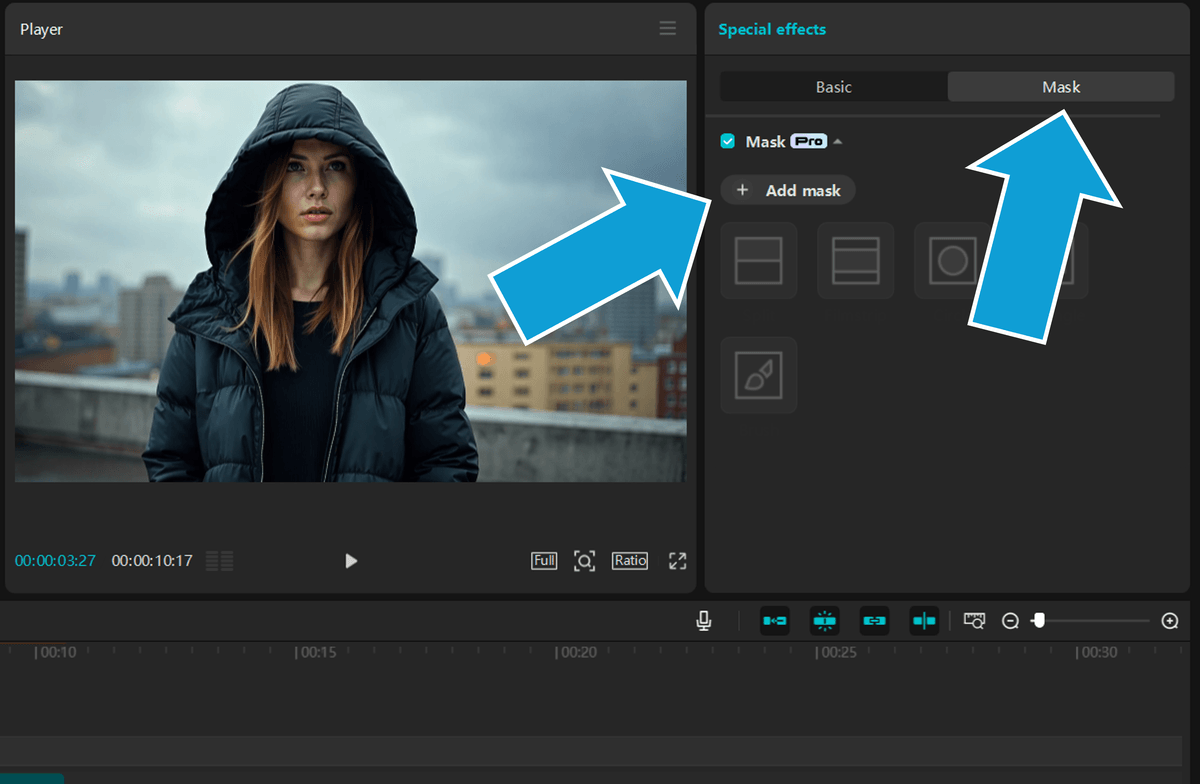
- From the options click "Brush"
- Using the brush, move over to the viewport and simply paint the background sections you want to remove. (You don't have to color everything in! Just do a few large strokes and CapCut's AI will do the rest)
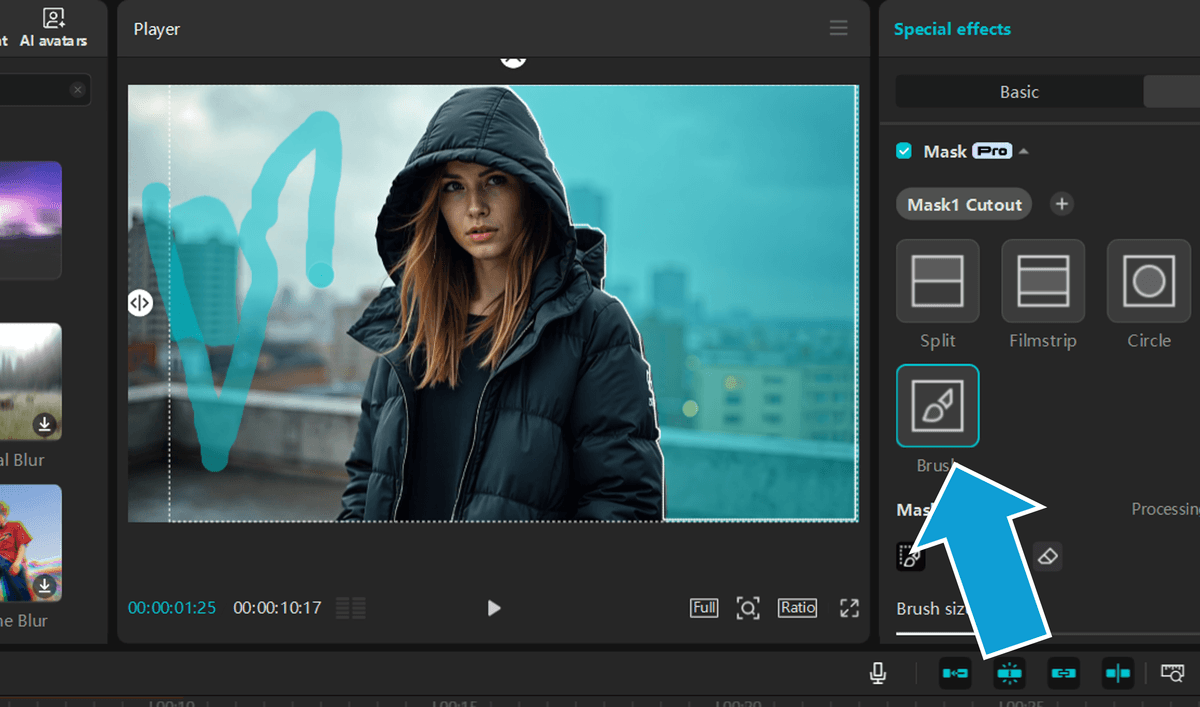
That's it! CapCut has now done a pretty good job at removing your background!
Blur the Background with Remove BG
Here's how to blue the background of your video using a blur effect and Remove BG:
- Bring your footage onto the timeline TWICE
- Click the top level footage, then in the top right panel, click "Remove BG", then check "Auto removal"
- Next, go to the effects panel and drag a blur effect onto the BOTTOM video clip, similar to what we did at the start of this article
Your timeline should look something like this:

That's it! I actually prefer this method as it's much faster than using the mask method.
Pro tip: If you want to edit the blur effect you added to the bottom clip, right click it then click "Edit effects". This will show the blur effect again so you can delete or edit it.
How to Blur a Face in CapCut
If you want to blur only a face in CapCut, you can use the same method we used in the Mask section from before BUT, that blurs the entire person! Here's how to blur a specific face using a blur effect and tracking:
- Add your blur effect to the timeline
- In the top right panel, click "Mask" then "Add mask"
- Click "Circle" (or whatever shape you want) then position and size it as needed. Your timeline should look like this:
- Scroll to the bottom in the Mask panel and click "Track"
That's it! Your blur will now track the face through the video clip like this. 👇
How to Transition a Blur Effect in CapCut?
For some reason, CapCut doesn't allow us to add keyframes to blur effects. This means the blur is either on or off and we can't easily animate them. Here's how to apply a blur effect using a smooth transition in CapCut:
- Decide where you want to blur in/blur out and make a Split
- Drag the right side clip to the upper timeline layer
- Extend the end of each clip so there's some overlap
- Add your blur effect to the top clip. Your timeline should look like this:
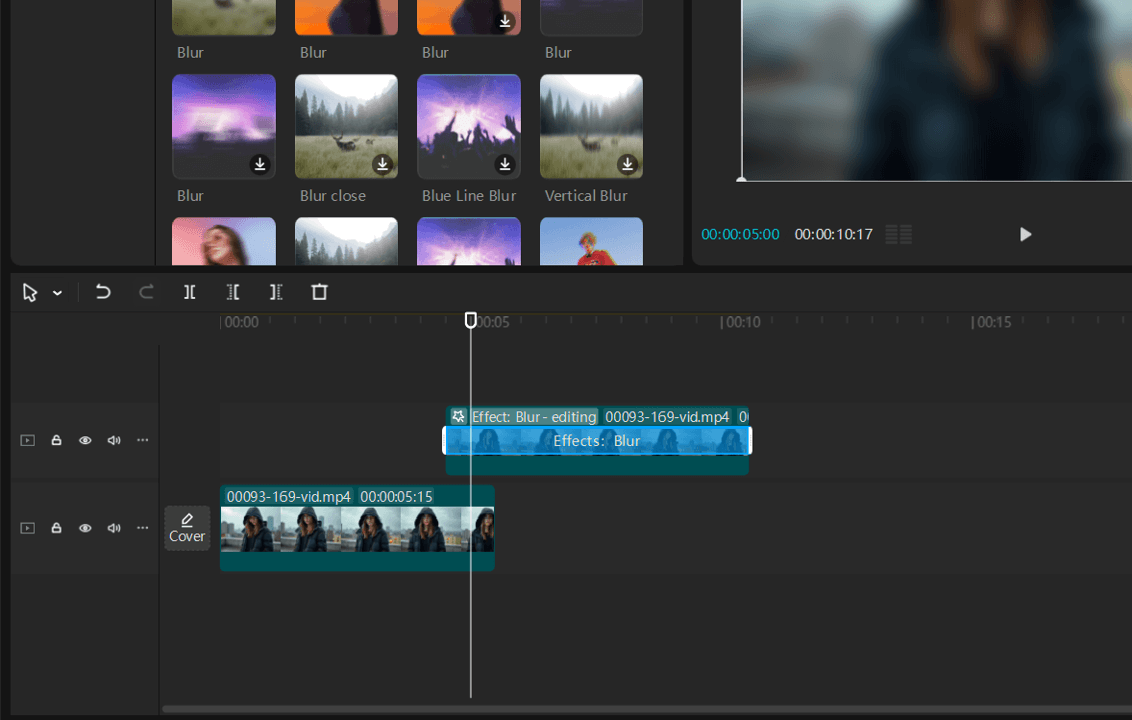
- Now, click the top level clip, move to the Basic panel in the top right, and click "Blend"
- Move the playhead to the start of your top level clip, set "Opacity" to 0, then click the keyframe diamond
- Move the playhead to the end of the bottom level clip
- Set "Opacity" to 100 (keyframe will automatically be added)
That's it! It's not the simplest or nicest method in the world, but this allows you to fade in and transition blur effects in CapCut. Here's the result:
Using the Motion Blur Effect
Motion blur is a cool little feature in CapCut that makes moving objects have a dynamic gaussian blur effect. It's become quite popular on social media platforms and feeds lately for fast paces content like sports. Here's how to apply it to your video clip:
- Click your clip
- Scroll to the bottom of the "Basic" panel
- Click the checkbox next to "Motion blur"
- Adjust the parameters as needed
Motion blur is a simple video editing trick you can add to original video to make it look that much better!
Wrapping Up
Today we covered everything there is to know about using blur to create an out of focus background, blur a subject, and even some AI powered motion blurring effects.
Adding CapCut's blur effects to your kit of video editing tools will enable you to create some pretty cool effects as you edit more content!
Happy editing 😎
Tired of Wasting Hours Looking For
Royalty-Free Assets?
Access our curated library of 100,000+ royalty free assets instantly


