How to Zoom in on CapCut: Complete Guide 2024
CapCut has become one of the most popular video editing software on the market, due to it's (mostly) free to use tools, and user-friendly interface.
Mastering the various zoom in effects in CapCut is fundamental and can transform your content from basic to professional, super quick!
In this beginner's guide, we'll explore how to zoom in on CapCut covering everything from basic techniques to advanced effects, taking you from zero to the pro levels.
Want 10 Royalty Free LoFi Tracks?
Enter your email and we'll send them now!
Understanding the Different CapCut Zoom Effects
Before diving into the technical aspects of how to zoom in on CapCut, it's important to understand the different types of zoom effects available. Don't worry, we'll be covering all of them. Feel free to skip ahead if you see the one you need early:
- Timeline Zoom: Basic timeline zoom in CapCut is an FAQ by a lot of new editors
- Basic Scale Zoom: The simplest form of zooming that affects the entire frame
- Zoom Lens Effect: A preset effect that creates dynamic zoom movements
- Slow Zoom: Precise control over zoom timing and movement using keyframe animation
- 3D Zoom: A stylistic effect that creates depth in your videos
- Zoom Templates: Pre-made zoom effects for quick implementation
Each zoom technique serves different creative purposes and can be used in different scenarios, depending on your requirements. Let's get into the fun stuff.
Basic Zoom Techniques in CapCut
Timeline Zoom (Navigation)
The timeline zoom is essential for precise editing, but it shouldn't be confused with the optical zoom in effect. To adjust your timeline view in CapCut:
- Locate the timeline at the bottom of your screen
- Use the "+" and "-" buttons on the right hand side, above the timeline, to zoom in or out of your timeline
- OR, use the slider next to the buttons

Alternatively you can use the scroll wheel while holding CTRL (PC) for more precise control
Simple Video Zoom In Using Scale
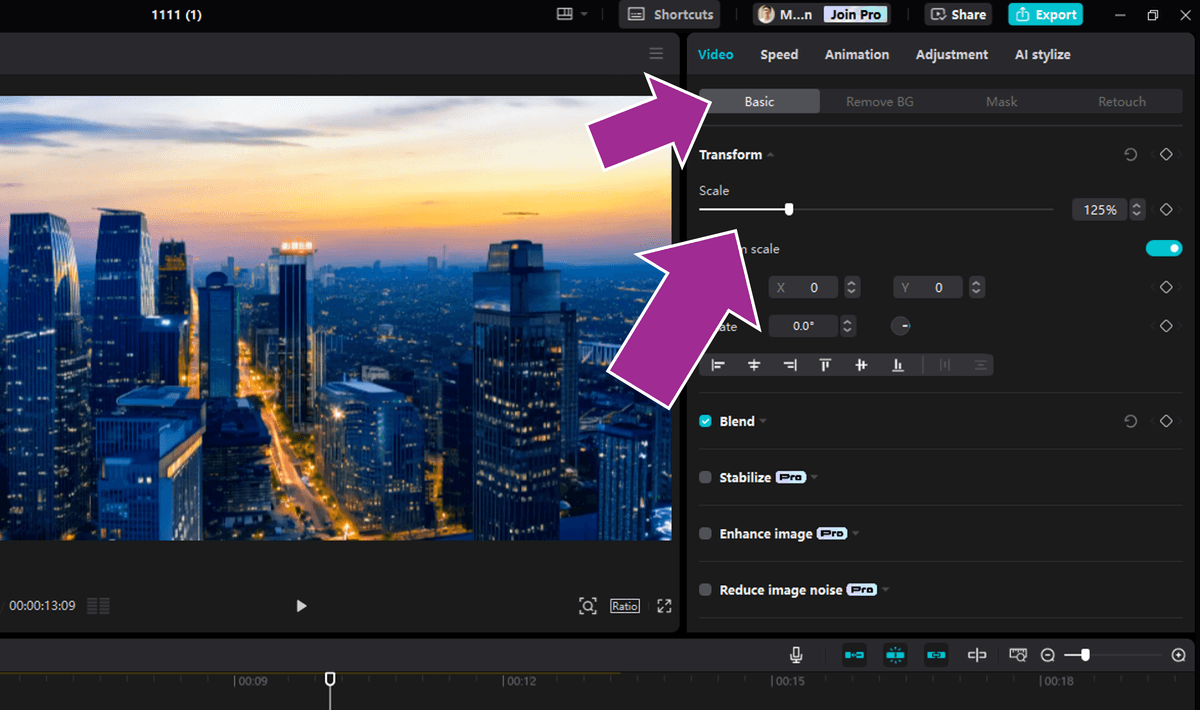
The most straightforward way to zoom in on CapCut is using the Scale feature. This basic zoom will increase the frame size, allowing you to fill the video editor viewport:
- Select your video clip in the timeline
- Navigate to the "Basic" section in the right panel
- Find the "Scale" slider under Video properties

- Drag the scale slider to adjust the zoom level (100% is normal, higher numbers zoom in) OR manually enter a zoom value in the text box
- Click the diamond next to Scale to enable keyframe animation on your zoomed video (more on this later.)
Using the Zoom Lens Effect
The Zoom Lens feature offers a quick way to add a pro level CapCut zoom effect:
- Select your clip on the timeline
- Click "Effects" in the top menu
- Search for "Zoom Lens" in the effects panel
- Drag the effect onto your clip

- Adjust the Range and Speed parameters in the effect settings
This method is perfect for creating quick, dynamic zoom effects without complex keyframing as it adds the effect to your video automatically with no fuss!
Advanced Zoom Effects in CapCut
So far we've seen how to zoom in on capcut using the pre-built effects. In this section, we'll look at some more advanced techniques to create custom slow zoom and zoom in effects. But don't be intimidated.. with the intuitive user interface you'll be zooming like a pro in no time.
How to Create Smooth Slow Zoom in Effect (With Keyframes)
Creating a smooth, cinematic zoom effect requires using keyframes for precise control. If you haven't used keyframes before, they can be a little bit confusing at first, but after using them a few times, you'll click!
- Start a new project or edit an existing one
- Select your video track and navigate to the video frame you want to start zooming from
- Go to the Basic settings panel
- Find the Scale option
- Click the diamond shaped keyframe icon to add your first keyframe (you'll see a small diamond shaped icon appear on your clip on the timeline too)

- Move the playhead to where you want the zoom to end
- Add another keyframe and adjust the scale value
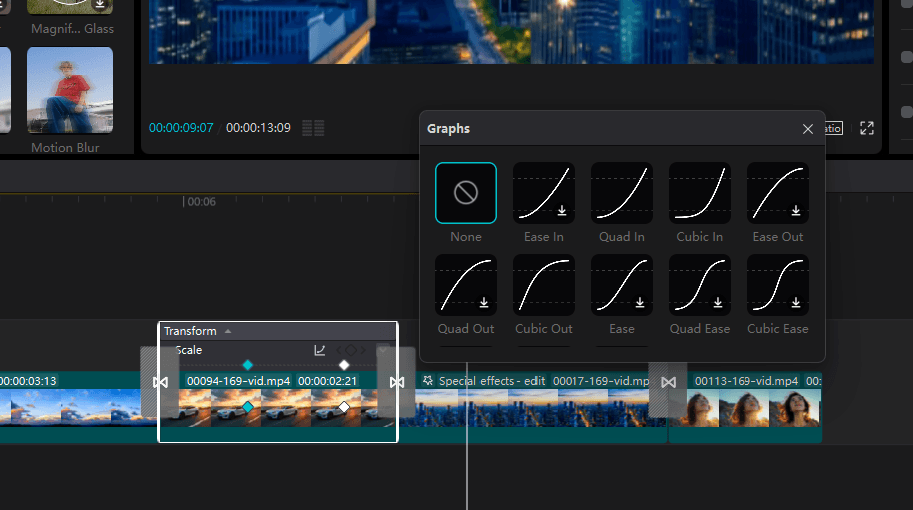
- Right-click the clip and select "Show Keyframe Animation"
- Use the Graphs button to adjust the zoom speed curve you want to apply - these make the zoom effect look WAY better!

Pro Tip: For the smoothest slow zoom effect, use a gradual curve in the keyframe graph rather than a linear transition.
Zooming into Specific Areas
This is the next logical question you'll be asking after learning how to zoom in on CapCut using keyframe animation. Zooming in on specific areas allows you to really show off your video editing skills.
To focus on a particular part of your video:
- Select your clip
- Open the Basic panel
- Adjust both Scale and Position parameters to your starting frame (you can click and drag in the viewport to adjust position, or use the text boxes)
- Add keyframes for both properties

- Scrub the playhead to your final frame and set your zoom, x, and y coordinates
This technique is particularly useful for highlighting specific details or creating dynamic transitions between focal points.
Creating Slow Zoom Transitions
Zoom transitions are a must! Once you start using zoom effect transitions in your work, you'll start to notice them literally everywhere on social media and short form feeds. The good news is they're simple AF to work with:
- Click transitions in the top left menu
- Search for "slow zoom"
- Choose either slow zoom out, or slow zoom in

- Click and drag the transition between two separate clips on your timeline
Note: If you get a warning saying "Create duplicate frames for transition" just click ok! It's just saying it will add some filler material so the transition will work properly.
Special Zoom Effects
How to Use 3D Zoom Effect
The 3D Zoom effect adds depth to your videos:
- Select your clip
- Click the Style button in the toolbar
- Select "3D Zoom" from the available options
- Adjust the intensity and duration as needed
- Use the preset options to modify the effect's appearance
Note: 3D Zoom works best with photos or steady video shots.
Using CapCut Zoom Templates
To use pre-made zoom templates:
- Click the "Templates" button
- Search for "zoom" in the template library
- Preview and select your preferred template
- Apply the template to your clip
- Customize the effect parameters to match your style
Learn how to delete the CapCut watermark.
Creating Custom Zoom Effects
Combine different zoom techniques for unique effects:
- Layer multiple zoom effects
- Experiment with different keyframe combinations
- Mix zoom with other effects like blur or color adjustments
- Save your custom presets for future use
Tips & Troubleshooting
Common Issues and Solutions:
1. Pixelation During Zoom
This distorted zoom is usually caused zooming too far in on your footage.
- Keep zoom levels under 150% for best quality
- Use higher resolution source footage
- Enable high-quality preview mode
2. Jerky Zoom Movement
This is caused from not using the Graphs we spoke about in the smooth zoom effect section.
- Add more keyframes for smoother motion
- Use the keyframe Graph to smooth transitions
- Extend the duration of your zoom effect
Pro Tips:
- Always work with the highest quality source footage
- Use the preview window at 100% scale to check quality (click the magnifying glass just below the view port to go full-screen)
- Create zoom effects slightly longer than needed for flexibility
- Combine zoom with subtle motion effects for enhanced impact
Tired of Wasting Hours Looking For
Royalty-Free Assets?
Access our curated library of 100,000+ royalty free assets instantly
Wrapping Up
Mastering how to zoom in on CapCut opens up a chest creative possibilities for your videos.
If you're creating content for social media, YouTube, or professional projects, these zoom techniques can help you achieve the exact look you're after.
And remember to experiment with different combinations of effects and always preview your work before final export, and most of all, have fun!
Ps. Now you're getting professional looking results with zooming effects, check out how to crop videos in CapCut.
Happy editing. 😎
CapCut Zoom in Effects FAQs
Why is my zoom effect blurry?
This usually occurs when zooming beyond 150%. Try using higher resolution footage or reducing the zoom level.
Can I save my zoom effects as presets?
Yes, CapCut allows you to save custom effects for future use through the Templates feature.
How do I make zoom transitions smoother?
Use keyframe graphs to create gradual acceleration and deceleration, and add more keyframes for precise control.
Where is the 3D zoom effect in CapCut?
Find it under the Style section in the editing panel. If it's not visible, ensure your CapCut version is up to date.
Can I combine multiple zoom effects?
Yes, you can layer different zoom effects and combine them with other video effects for unique results.
